Using MultiMarkdown in Scrivener, part 1
by Larry Kollar
Markdown was created by John Gruber to make it easier to write blog posts. It has been extended every which way to work with more technical documents, but the vanilla version is well-suited for writing fiction as well as blog posts.
Some advantages of Markdown include:
-
Outputs to many formats, including squeaky-clean HTML, which is really important when building an EPUB.
-
Any text editor can handle composition in Markdown. Many editors support syntax highlighting for Markdown as well.
-
Scrivener supports an extension called MultiMarkdown, so you can have all the advantages of Markdown without losing the organizational greatness of Scrivener.
If you’ve ever decorated a text-only email, you already know how to use most of Markdown. Here’s an example that easily covers 90% of what you do in fiction writing:
# The Swamp Road

Night was falling,
yet Joe doggedly marched up the swamp road.
Time was pressing,
after all.

In the flickering light of his torch,
Joe saw two signs:

**SHORTCUT LEFT**

**Do NOT take the shortcut!**

He pondered the advice for only a second.
*Bah*, he thought,
*I have to get home*.

Taking the left fork,
Joe soon found himself sinking in the bog.
Let’s see how this looks when formatted:
The Swamp Road
Night was falling, yet Joe doggedly marched up the swamp road. Time was pressing, after all.
In the flickering light of his torch, Joe saw two signs:
SHORTCUT LEFT
Do NOT take the shortcut!
He pondered the advice for only a second. Bah, he thought, I have to get home.
Taking the left fork, Joe soon found himself sinking in the bog.
It’s pretty easy to see how this translates:
blank lines start a new paragraph.
Use asterisks to highlight, *for italic*
and **for bold**.
The number of pound (or hash) characters
set the heading level.
For example, # Heading 1,
## Heading 2, and so on.
In the example above, I broke lines inside each paragraph so each line is a phrase. That’s not necessary; you can go long and run your paragraphs together, like you would in Scrivener or a word processor. Either way, put a blank line between paragraphs, and Markdown properly formats them.
Getting Started
Make a copy of your WIP in Scrivener. Got it open? Original one is closed? Okay, let’s get started.
Click the Scrivenings icon in the toolbar, then click the Draft or Manuscript icon in your Binder (whichever one your story is in). You should now see your entire story laid out in Scrivener.
Click anywhere in the story text, then go to Format menu→Convert→Bold and Italics to MultiMarkdown Syntax. If you use anything other than bold/italic in your writing—like typewriter font for text messages, or blockquotes to format letters from a secret admirer—you’ll have to go through your manuscript and mark those yourself. This is that other 10% I mentioned earlier.
Stylin’
Scrivener has formatting presets, since it only remembers the formatting and not the preset name after you apply it. Not as good as styles, but they work for our purposes.
Markdown uses backticks (a/k/a accent grave)
to define typewriter font:
`this is a text message`.
You can either insert your backticks by hand,
or let Scrivener insert them when you publish.
I defined a preset called Typewriter for this,
but you can either define a new preset or redefine an existing one.
Here’s how it works:
any string of text marked “Preserve Formatting”
(Format menu→Formatting→Preserve Formatting)
gets the backtick treatment at Compile time.
So go find a text message or other small string of typewriter text in your manuscript, and select it. Apply Preserve Formatting as described above, and the text gets highlighted in cyan or light blue.
Now, go Format menu→Formatting and:
- for a new preset: New Preset from Selection
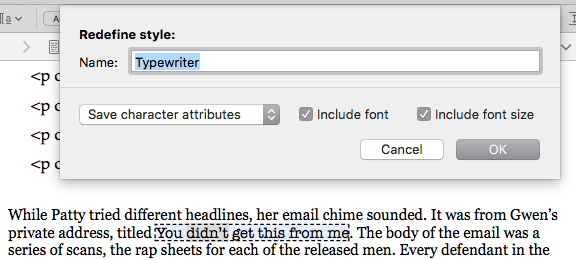
- to redefine a preset: Redefine Preset from Selection→(preset name)
For a new preset, enter the name in the dialog box. In both cases, select Save Character Attributes in the dropdown to create a text (as opposed to a paragraph) preset. Now, any time you mark a selection of text as Typewriter (or TextMsg, or whatever you called it), you’ll see it highlighted and in your designated typewriter font.
To make a block quote, put a > at the beginning of each paragraph
in the block,
and in any blank lines in between.
Add a blank line to the end of the blockquote
so the next paragraph doesn’t get picked up as well.
Scrivener assumes that preserved-format paragraphs
are code blocks, meant to be displayed as-is,
so you can’t use its Block Quote preset this way
unless you turn off Preserve Formatting.
In either case, you’ll have to add the > character.
Next time…
Now that you can easily format your magnum opus using MultiMarkdown, we’ll have a look at how to output it. Until next time!
Subscribe via RSS